
Low Sodium Pie Crust Recipe
This low sodium pie crust recipe is light, flaky, and has just 3 simple ingredients! This no-fuss pie crust is made in a food processor, and is easy to roll out.
Perfect for sweet or savory pies (hello low sodium chicken pot pie!) this tasty pie crust can be refrigerated or frozen too. A truly easy recipe that will elevate your next pie with the perfect low sodium and salt-free crust!
Want more great low sodium baking recipes? Try our easy low sodium no-knead bread, pull-apart pull-apart dinner rolls, and our super moist low sodium cornbread.
We’re deep in winter, and I’ve been having a ton of fun doing some low sodium baking lately. I needed a good pie crust recipe for my low sodium chicken pot pie, and I wanted to try making my own pie crust from scratch!
I adapted this recipe from one of my favorite bakeries down the street – they gave me their pie crust recipe and I made my own low sodium version. The result is an irresistibly flaky and tender crust! Better than any store-bought pie crust out there.
Why This Recipe Works
- It has all the same flavor and buttery texture of classic pie crust, without any added salt!
- It’s EASY to make – add your ingredients in a food processor, and you have perfect dough in 5 minutes.
- It works for both sweet and savory pies (and even our favorite low sodium quiche!)
- Cooks and bakers of any skill level can make this recipe using our easy step-by-step instructions below.
Ingredients You’ll Need

You only need 4 simple staple ingredients for this easy dish – nothing fancy here!
All purpose flour – I used a regular all purpose white flour for this crust.
Unsalted butter – this recipe uses 2 sticks (1 cup) of unsalted butter. Make sure it’s unsalted, and always check labels before baking!
Sugar – I add just a little bit for flavor. You could omit if desired, but even for savory pies I like a touch of sugar in there.
Cold Water – a little cold water (must be cold!) makes the dough the perfect consistency.
Be sure to visit the recipe card below to see the full ingredient amounts and directions!
Additions and Substitutions
- You could try this with half whole wheat flour (and half all purpose white) for a more wholesome crust if desired.
- For a sweeter crust, double the sugar!
- For a more savory crust, add dried herbs, fresh chopped garlic, and black pepper.
How To Make This Pie Crust

Step 1: Unwrap your unsalted butter, and dice it into small pieces.

Step 2: Add the flour and sugar to a food processor. Pulse a few times until well mixed.

Step 3: Add the diced butter into the flour and sugar mix.

Step 4: Pulse for about 20 seconds, until the butter has further broken down into the crust.

Step 5: Place the lid back on, and start the processor. Stream in the cold water until a thick dough forms.

Step 6: The dough should be dense and crumbly, but be able to stick together when rolled into a ball.

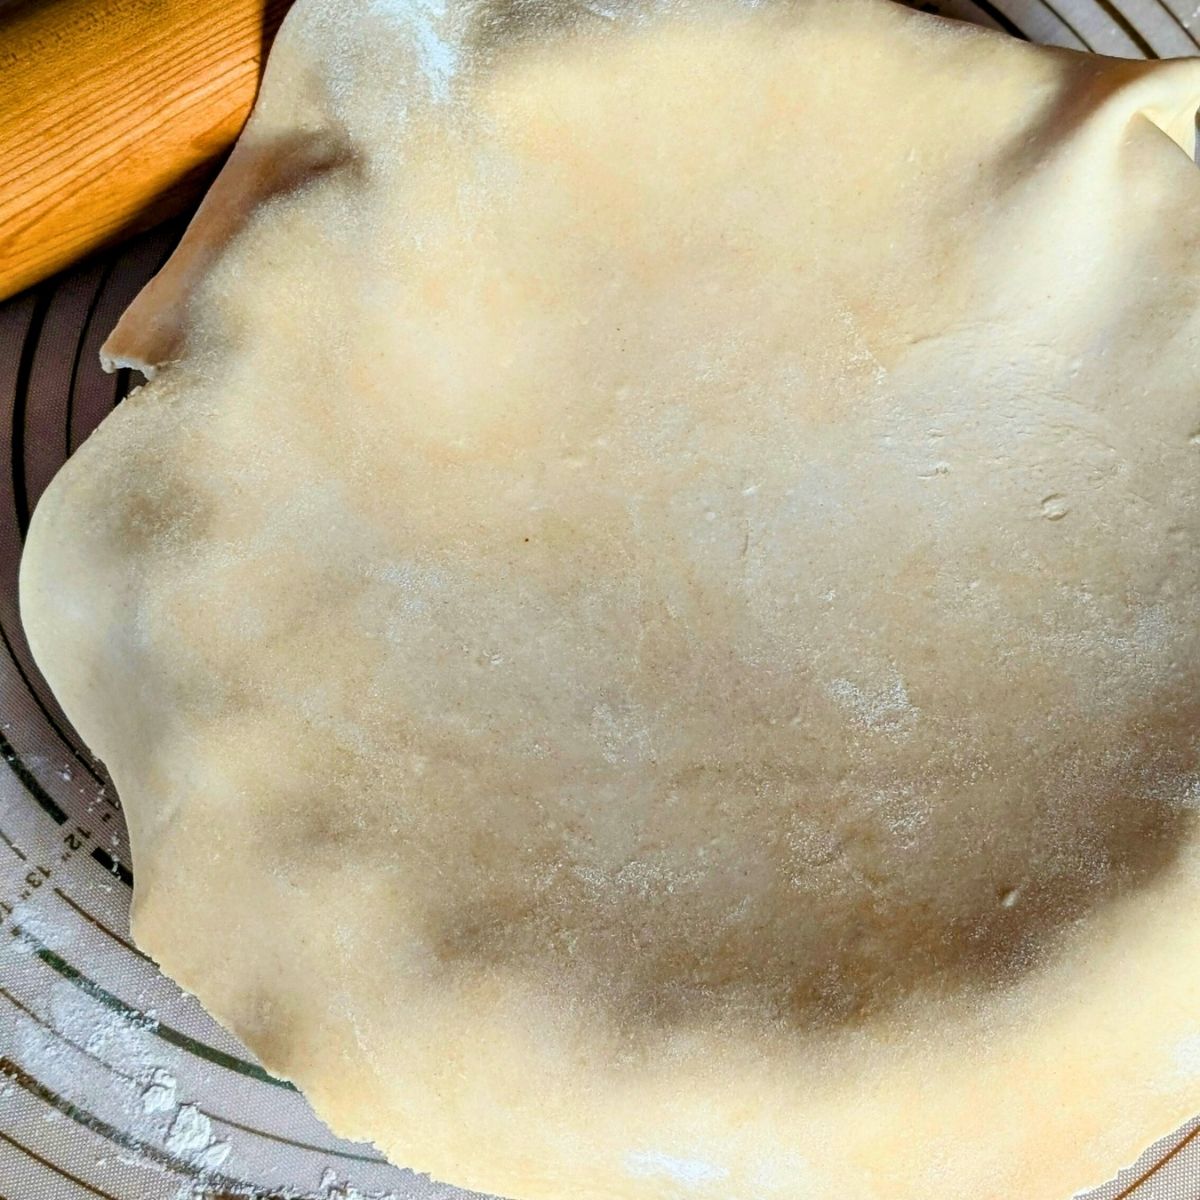
Step 7: Turn the dough out onto a baking mat, and shape the dough into two even balls.

Step 8: Roll out and use the dough, or wrap and refrigerate for up to 5 days.
Recipe FAQs
This low sodium pie crust recipe has 16 mg sodium (for 1 crust), as it uses unsalted butter, low sodium flour and sugar, and no added salt. If you get prepared pie crusts from the store or from a bakery/restaurant, they may contain more sodium as many pie crust recipes call for salt.
Cutting the butter into small cubes, then processing it in a food processor with the flour with give the crust a light and flaky texture the smaller the butter pieces are.
If you’ll be using the pie dough within 5 days, you can wrap it in plastic wrap and store in the refrigerator. If using it after 5 days, wrap in plastic wrap and place in an airtight container (I use a freezer bag) and freeze for up to 3 months. If freezing, make sure to thaw the dough before rolling out and baking.
Expert Tips
- If you don’t have a food processor you can absolutely make this dough by hand! Make sure to cut the butter into very small pieces and work it into the flour with your hands, until the butter is in small pebbles. Mix the water in and knead by hand until dough reaches a consistency that you can roll out.
- Or mix in a stand mixer – follow the same instructions as the food processor above, and use the paddle attachment until dough forms.
- If baking the pie crust after rolling it out – preheat the oven to 400 degrees Fahrenheit. Drape 1 half of the dough in a pie tin or dish, and add pie weights or dried beans which will keep the dough from forming bubbles when baking. Bake for 15-20 minutes until golden brown and flaky. Remove pie weights or dried beans, and add filling into the crust.

More Low Sodium Baking Recipes
- Low Sodium Kolacky Cookies
- Low Sodium Carrot Cake
- The best Low Sodium Blueberry Muffins
- Low Sodium Banana Bread
- Low Sodium Sugar Cookies
Let’s keep in touch – don’t forget to follow over on Instagram, Facebook, & my Youtube channel for more easy low sodium recipes.
If you made this recipe please leave a star rating & comment below. Your feedback helps other people who are making this recipe.

Our FIRST Low Sodium Cookbook is now available!
Check out Low Sodium Dinners: 100+ Low Sodium Recipes That Actually Taste Good, available here:

Low Sodium Pie Crust
Equipment
- food processor
- Plastic Wrap
Ingredients
- 2.5 cups all purpose flour
- 1 cup unsalted butter 2 sticks
- 1 tablespoon granulated sugar
- ⅓ cup cold water or more if needed
Instructions
- Unwrap your unsalted butter, and dice it into small pieces.
- Add the flour and sugar to a food processor. Pulse a few times until well mixed.
- Add the diced butter into the flour and sugar mix.
- Pulse for about 20 seconds, until the butter has further broken down into the crust.
- Place the lid back on, and start the processor. Stream in the cold water until a thick dough forms. The dough should be dense and crumbly, but be able to stick together when rolled into a ball.
- Turn the dough out onto a baking mat, and shape the dough into two even balls.
- Roll out and use the dough immediately, or wrap and refrigerate for up to 5 days.
Notes
- If you don’t have a food processor you can absolutely make this dough by hand! Make sure to cut the butter into very small pieces and work it into the flour with your hands, until the butter is in small pebbles. Mix the water in and knead by hand until dough reaches a consistency that you can roll out.
- Or mix in a stand mixer – follow the same instructions as the food processor above, and use the paddle attachment until dough forms.
- If baking the pie crust after rolling it out – preheat the oven to 400 degrees Fahrenheit. Drape 1 half of the dough in a pie tin or dish, and add pie weights or dried beans which will keep the dough from forming bubbles when baking. Bake for 15-20 minutes until golden brown and flaky. Remove pie weights or dried beans, and add filling into the crust.
-
- You could try this with half whole wheat flour (and half all purpose white) for a more wholesome crust if desired.
-
- For a sweeter crust, double the sugar!
-
- For a more savory crust, add dried herbs, fresh chopped garlic, and black pepper.
Nutrition estimate (for 1 serving)
*Please note, all nutrition content is estimated based on the ingredients we used in our kitchen. It will vary based on your ingredients. Always check your nutrition labels to verify your nutrition content and sodium amounts.
This post may contain affiliate links. Please note I may earn a small commission from qualifying purchases from affiliate programs, at no additional cost to you. Please read our privacy policy for more information.


I just tried this pie crust recipe, and it turned out amazing! I’ve been looking for a good low-sodium alternative for a while, and this one exceeded my expectations. The texture was beautifully flaky and crisp, and I didn’t miss the salt at all. I was a bit worried that a low-sodium crust might taste bland, but the buttery flavor really came through, and it paired perfectly with my filling (I used it for a classic apple pie).
I followed the recipe exactly, using unsalted butter, and it was easy to work with. The dough rolled out smoothly and didn’t crack or tear, which I sometimes struggle with when making homemade crusts. I also loved that this recipe doesn’t require any complicated ingredients—just simple pantry staples.
This is definitely my new go-to pie crust! I’m planning to use it for a savory quiche next time to see how it holds up with different fillings. Thank you for sharing such a great alternative for those of us who need to watch our sodium intake!
Hi Annie, thank you so much for the rating and review!! I just published my low sodium chicken pot pie recipe today that I used this crust for and it was fantastic in savory dishes too! I am so happy it turned out for you, thank you again! If you’re looking for a good low so quiche recipe, we have one on this site too 🙂
– Kelly
How can one serving of pie crust be 1400 calories??
Looking forward trying this. Have you compiled a cookbook with all these great low sodium recipes?
Hello Jane, yes I did publish a cookbook last December, our first! It’s called Low Sodium Recipes and you can order it on Amazon here!
– Kelly
My husband is the pie maker and swears this is the best one great tasting and good for us