Low Sodium Cheese Ball Recipe
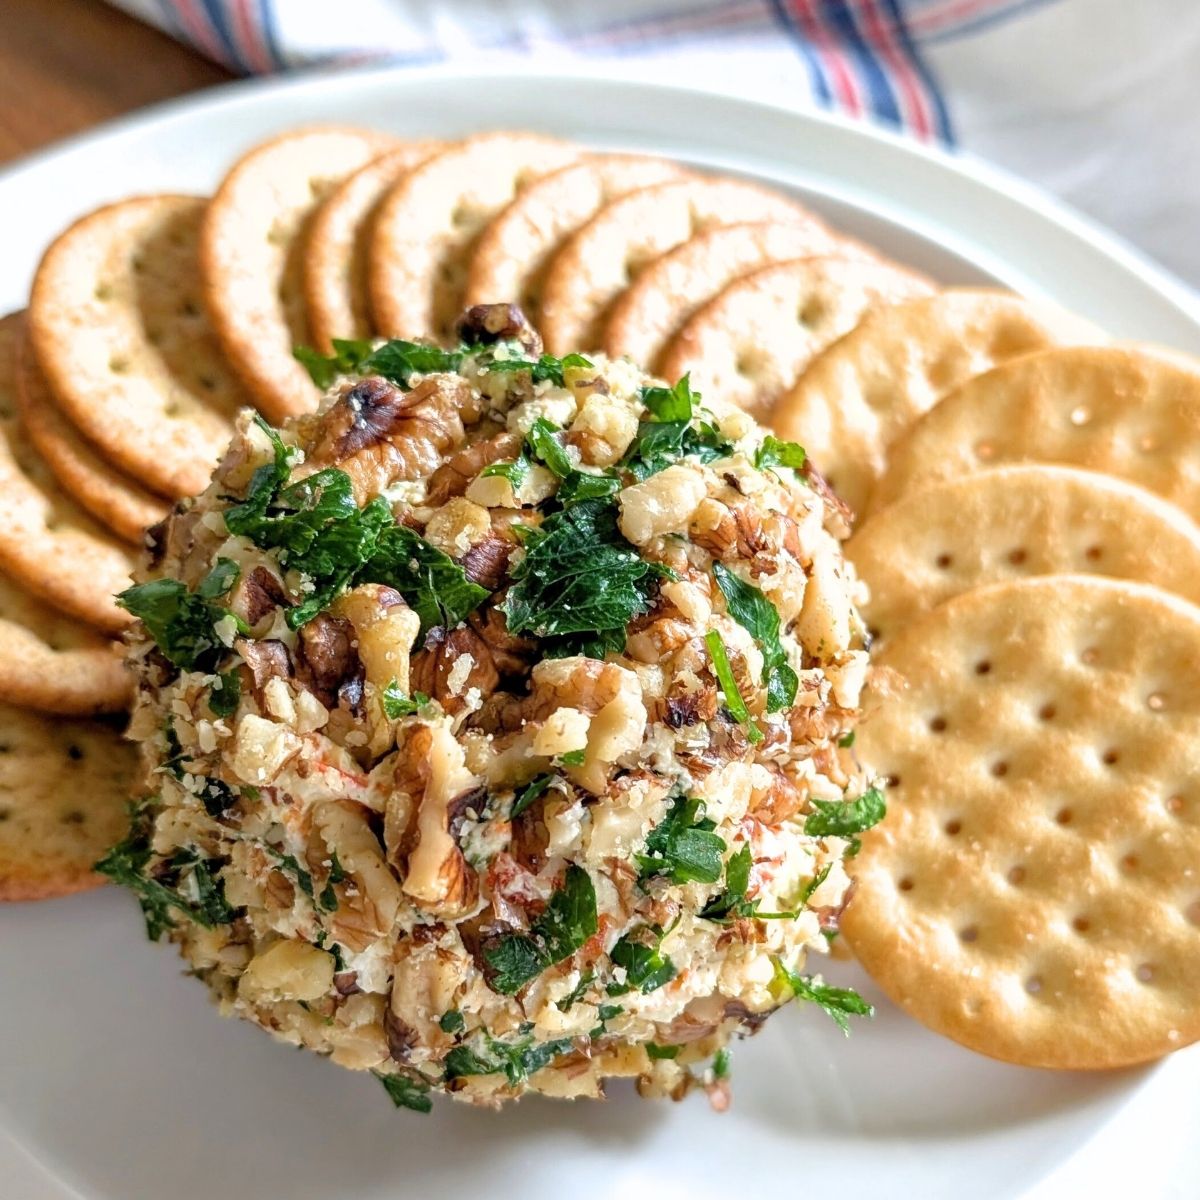
The low sodium cheese ball recipe is savory, tangy, herby, and SO great to spread on unsalted crackers, fresh vegetables, or crostini! Start with whipping softened cream cheese with chopped vegetables and spices, and rolling the cheese ball in crushed, unsalted walnuts.
This is a fantastic appetizer for the holidays, to serve on game day, or just to put out as a snack for company! And no one will be able to tell this cheese ball is low in sodium – it’s so flavorful, it will be enjoyed by all.
Want more great low sodium appetizer ideas? Try our low sodium onion dip, low sodium chicken wings, or our low sodium loaded nachos!
I had a wonderful time coming home for the holidays to finish up my new cookbook Low Sodium Dinners: 100+ Low Sodium Recipes that Actually Taste Good! My family was a huge help, and they requested that I make a low sodium cheese ball, a Midwestern holiday classic.
And the result? A creamy, nutty, and savory cheese ball that was spread on low sodium crackers and enjoyed by everyone! And let me say – my family are big cheese spread fans, and even they devoured this low sodium cheeseball and loved the flavor. And asked me to make it multiple times.
This makes a fantastic dish for parties, great as a snack, or perfect for a quick and no-cook holiday appetizer!
Why This Recipe Works
- It’s creamy, delicious, and filled with great flavor in each bite!
- The cream cheese is a great low sodium base for this cheese ball.
- A versatile appetizer to serve with your favorite low sodium crackers.
- It’s an easy no-cook appetizer can be made by cooks of any skill level.
- So flavorful, even salt-eaters will enjoy this cheese ball!

Ingredients You’ll Need
- Cream cheese – I used Philadelphia regular cream cheese that you can find in most grocery stores. It has 110 mg sodium per one ounce of cream cheese, or 1/8th of the package. You can use a different brand cream cheese if you can find a lower sodium option at the store. But this one worked for me, and I use it in the nutrition estimate below.
- Onion powder & garlic powder, which add a great flavor into the cream cheese mix!
- Vegetables – I grated carrot and bell pepper, and finely chopped parsley and green onion for the inside of the cheeseball.
- Walnuts – raw and unsalted. You can use whole walnuts (and crush by hand, which is what I did) or but pre-crushed. The walnuts give the outside of the cheeseball a great texture and added crunch.
Additions and Substitutions
- You can change up the vegetables in side the cheese ball to suit your tastes – grated radish, red onion, or cucumber would all be delicious additions.
- You can try using other types of unsalted nuts to coat the cheese ball in – crushed cashews would be delicious, as would pecans.
- Add some heat – for a spicier cheese ball you can add a pinch of cayenne pepper or diced pimientos to make a pimiento cheese spread.
- Fresh parsley is preferrable (as it gives the cheese ball a wonderful herby flavor) but you can substitute 1 teaspoon of dried parsley or Italian seasoning mix instead.
How To Make A Low Sodium Cheese Ball

Step 1: Soften cream cheese to room temperature – set it out for about 1 hour. Unwrap cream cheese and place in a large mixing bowl (or the bowl of a stand mixer). Whip the cream cheese until it’s well combined.

Step 2: To the whipped cream cheese, add the grated carrot, finely chopped bell pepper, chopped green onions, 2 tablespoons of the fresh parsley, onion powder, and garlic powder.

Step 3: Whip or mix again well until combined – the vegetables should be evenly distributed in the cream cheese.

Step 4: Take a piece of plastic wrap and lay it out. Scoop out the mixed cream cheese onto the plastic wrap and form into a ball, covering the cheese ball with the plastic wrap. Place the ball in the fridge for 10-15 minutes to firm up.

Step 5: Take the remaining two tablespoons of the fresh parsley, and add them to a plate with the crushed walnuts. Once cheese ball is firm, unwrap and roll it in the nut and parsley mixture, until fully coated.

Step 6: Plate up with your favorite vegetables or low sodium crackers, and enjoy!
Recipe FAQs
This low sodium cheese ball recipe has 116 mg of sodium per 2-tablespoon serving, using fresh vegetables, no-salt-added spices, and unsalted walnuts. Store-bought cheese balls or cheese spread can contain more sodium, so be sure to check labels before enjoying.
A cheeseball is usually a ball of soft spreadable cheese that is coated in nuts or herbs, and served by being spread on a cracker or with vegetables. For this cheeseball recipe, I used cream cheese as the base as it’s relatively low in sodium, compared to other types of cheeses that are traditional in cheese balls.
I like serving crackers or crostini bread slices that people can spread the cheeseball on to. Unsalted pretzels would also make a great options. You can serve fresh veggies like cut carrot sticks, celery, cherry tomatoes, or cucumber slices with the finalized dish for a lower sodium option than crackers (I like Hint of Salt Ritz).
Expert Tips
- Softening the cream cheese to room temperature before mixing is a must! If the cream cheese is hard, it is difficult to mix the vegetables into.
- If you don’t have a hand mixer or stand mixer, you can mix by hand! It may take a big more elbow grease, but hand mixing the vegetables into the cream cheese works just fine.
- If you are crushing the walnuts by hand, I put mine in a plastic bag then crush with a rolling pin or can of vegetables. That way, the crushed nuts stay in the bag, which prevents a mess in the kitchen.

More Low Sodium Appetizers!
- Low Sodium Sour Cream and Onion Dip
- Low Sodium Chicken Wings
- Salt-Free Pico De Gallo Salsa
- Low Sodium Loaded Nachos
- Low Sodium Cowboy Caviar Dip
Let’s keep in touch – don’t forget to follow over on Instagram, Facebook, & my Youtube channel for more easy low sodium recipes.
If you made this recipe please leave a star rating & comment below. Your feedback helps other people who are making this recipe.
Our FIRST Low Sodium Cookbook is now available!
Check out Low Sodium Dinners: 100+ Low Sodium Recipes That Actually Taste Good, available here:

Low Sodium Cheese Ball
Equipment
- Mixing Bowl
- Mixer
- Plastic Wrap
Ingredients
- 8 ounces cream cheese softened
- ¼ cup carrot grated
- ¼ cup bell pepper grated
- ¼ cup green onions finely chopped
- 1 teaspoon onion powder
- 1 teaspoon garlic powder
- ½ cup fresh parsley chopped, divided
- ½ cup unsalted walnuts crushed
Instructions
- Soften cream cheese to room temperature: remove from refrigerator set it out for about 1 hour. Unwrap cream cheese and place in a large mixing bowl (or the bowl of a stand mixer). Whip the cream cheese until it's light and airy.
- To the whipped cream cheese, add the grated carrot, finely chopped bell pepper, chopped green onions, 2 tablespoons of the fresh parsley, onion powder, and garlic powder. Whip or mix again well until combined.
- Take a piece of plastic wrap and lay it out. Scoop out the mixed cream cheese onto the plastic wrap and form into a ball, covering the cheese ball with the plastic wrap. Place the ball in the fridge for 10-15 minutes to firm up.
- Take the remaining two tablespoons of the fresh parsley, and add them to a plate with the crushed walnuts. Once cheese ball is firm, unwrap and roll it in the nut and parsley mixture, until fully coated.
- Plate up with your favorite vegetables or low sodium crackers, and enjoy!
Notes
- Softening the cream cheese to room temperature before mixing is a must! If the cream cheese is hard, it is difficult to mix the vegetables into.
- If you don’t have a hand mixer or stand mixer, you can mix by hand! It may take a big more elbow grease, but hand mixing the vegetables into the cream cheese works just fine.
- If you are crushing the walnuts by hand, I put mine in a plastic bag then crush with a rolling pin or can of vegetables. That way, the crushed nuts stay in the bag, which prevents a mess in the kitchen.
Nutrition estimate (for 1 serving)
*Please note, all nutrition content is estimated based on the ingredients we used in our kitchen. It will vary based on your ingredients. Always check your nutrition labels to verify your nutrition content and sodium amounts.
This post may contain affiliate links. Please note I may earn a small commission from qualifying purchases from affiliate programs, at no additional cost to you. Please read our privacy policy for more information.




Tastes better than store bought and so much more economical too